BoldMinded acquires Ansel, support ending for all add-ons. BoldMinded acquires Ansel, support ending for all add-ons. Read More
Construct Control Panel
# Settings
Construct 2’s settings have been slimmed down a little from the Construct 1 days. That is mostly due to the fact that Template Preferences have been moved to their own section of the control panel. You will now find four settings in the settings area.
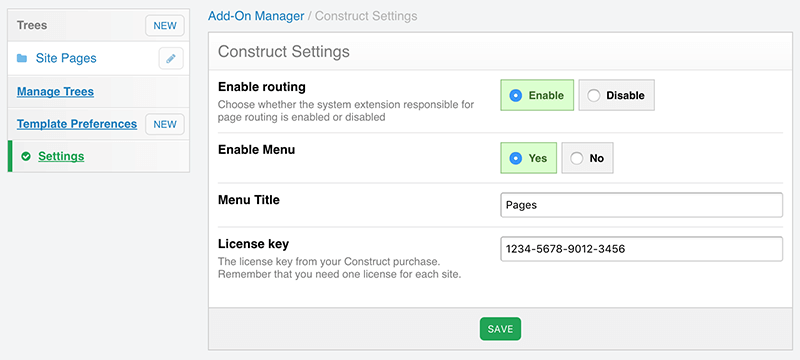
# Enable Routing
Construct serves two purposes:
- A powerful drag and drop menu creation system
- Create page endpoints
The “Enable Routing” toggle determines whether the second of those purposes is being used or not. If you would like to only use Construct to create menus, you can disable routing. This will also hide all page creation options when creating or editing nodes (items in the menus).
# Enable Menu
This “Enable Menu” toggle determines whether Construct makes it’s menu item available to the menu manager in ExpressionEngine 3.4.x +.
# Menu Title
This “Menu Title” setting sets the name of the drop down menu when you have enabled Construct’s menu item in the menu manager.
# License Key
This is where you enter the license key from your purchase of Construct. If you have not entered a license key, Construct will display a friendly reminder to do so throughout it’s control panel pages.
Note
You need to purchase one license for each public domain name you use Construct with (you do not need additional licenses for local dev and staging sites behind passwords).
# Template Preferences
Construct’s Template Preferences are a way of associating a user friendly name with an ExpressionEngine template. Each Construct Template Preference is a one to one relationship with an EE template.
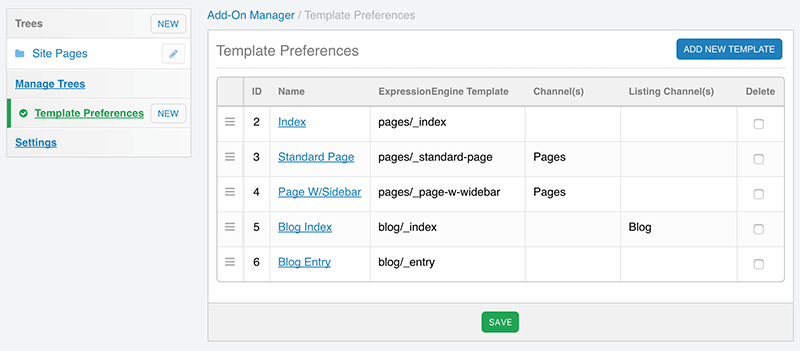
There are two steps to enabling templates to be selected by nodes:
- Create a template preference for the EE templates you would like to have available
- Later when creating Trees, chose one or more Template Preferences to make available to nodes in that Tree (more on that later)
Note
Routing must be enabled to associate Template with Nodes.
# Ordering Template Preferences
When viewing your Template Preferences, you can drag and drop the order of the templates. This affects the order they are seen in when selecting them for use on a Node. After sorting the order of your templates via drag and drop, be sure to click the save button at the bottom of the form.
# Deleting Template Preferences
You can also delete one or more Template Preferences at a time. To delete Template Preferences, select the Delete checkbox for one or more templates and click the save button at the bottom of the form.
# Template Preferences Options
Template Preferences have learned a few new tricks in Construct 2. You can now designate channels a template can list entries from in addition to specifying a channel to make entries available on a one to one basis with the template.
And two new toggles for specifying the template as a listing template or a listing category template are here as well.
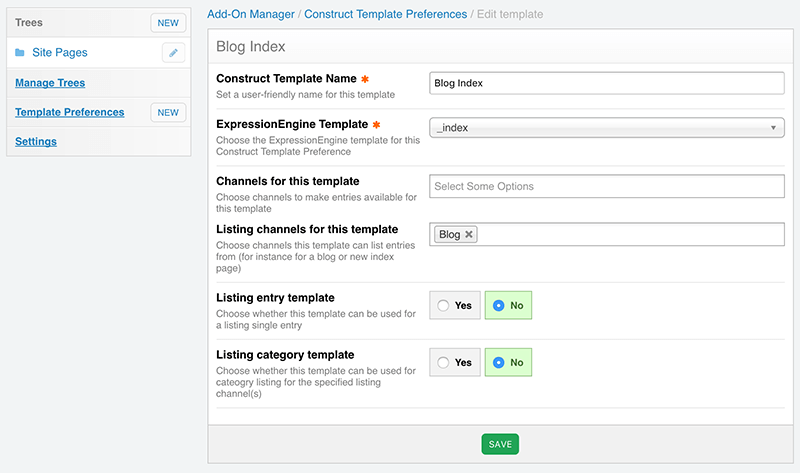
# Construct Template Name
As you would expect, this is the friendly name of your template. It is the name users see when they select the template to associate it with a Node.
# ExpressionEngine Template
This is the EE template for this Template Preference.
# Channels for this template
Choose which channels to make entries available to this template from.
# Listing channels for this template
Choose which channels can this template list entries from.
# Listing entry template
Specify whether this template can be used for single entries (single entries from the listing channel).
# Listing category template
Choose whether this template can be used to list category entries.
# Trees
Construct Trees are containers for nodes. You may create as many trees as you like. Each tree has settings for what member group has access to it. For instance, you may wish to have a Tree for the main navigation, secondary navigation (perhaps in the footer or something like that), and general site page that are not in any menus.
In short, you can use as many Trees as you like however you like.

On a new installation and/or when there are no Trees in Construct yet, if you are a Super Admin, you will be presented with the option to create a new tree from the Manage Trees section as soon as you visit construct.
Any Trees a member group has access to will appear in the left sidebar. If a non-Super Admin group only has access to one tree, they will not see the sidebar and will only see the tree they have access to.
# Ordering Trees
Trees appear in a specific order in the sidebar. To rearrange the order they appear in, click on “Manage Trees” in the sidebar. Just like with template preferences, you can drag and drop to sort and click save at the bottom of the form to save the order.
# Deleting Trees
As with Template Preferences, if you wish to delete a Tree and all the Nodes in that Tree, select the Delete checkbox in the right hand column and click save at the bottom of the form.
Note
Please take note that deleting a Tree deletes all the Nodes in that Tree. DELETING A TREE AND ITS NODES IS A DESTRUCTIVE ACTION AND IS NOT RECOVERABLE WITHOUT A DATABASE BACKUP.
# Tree Options
# Tree Name
This is the name that will appear to users in the sidebar.
# Maximum nesting level
This determines how many levels deep a Node may be.
# Tree templates
Choose what templates are available to Noes in this tree for building pages.
Note
Routing must be enabled to associate Template with Nodes.
# Tree Member Group Access
Choose what member groups other than Super Admins can access this Tree.
# Editing Nodes
Nodes are menu items/pages within a tree. To add or edit Nodes for a Tree, select the Tree in the left had sidebar. From there you can either edit existing nodes by click on the pencil edit icon to the right of a node, or you can add a new node by clicking the blue Add New Node button.
To delete nodes, select the checkbox on the very right-most side of the node, at the bottom of the form, options will appears that will allow the deletion of the selected Node(s).
Note
You can also use the select box at the very top right of the form to select all Nodes.
The “select all” checkbox at the top of the form selects all nodes whether they are visible or not.
# Nested Nodes
When you visit a Tree page, you will only see the top level nodes initially. If there are any nested nodes, they are collapsed. To see these nested nodes, click the triangle next to the Node name to expand sub nodes.
# View pages/external link
You can always view the resource the Node points to by clicking the link to the right of the Node’s name.
# Node Information
Other information about the Node is available on the lower line under the name of the node such as its ID, slug, whether it has been set to show up in the menu, and whether it creates a page.
# Node Options
When adding or editing a Node, there are a number of options available to you.
# Name
Give this Node a name. Typically you would use this in the menu output (via template tags).
# Slug
The slug is used to compose the URLs and full paths of the Node. If the node is on the top level, the full path and the slug will be the same. However, if you the node is nested under another node, Construct builds the path based on the slugs. For instance, if a Node with the slug “our-ceo” was nested under a Node with the slug “about”, the full path of the Node would be “about/our-ceo”.
# External Link
If you need the menu item of your Node to point to an external link, you can use this field (you will need to account for this with your template tags).
# Show in Menu
Choose whether to show this Node in the menu output (this can be overridden with tag parameters as needed).
# Node Page Tools
When Construct’s Routing is enabled, Nodes will have a section in their options called “Page Tools.” With these options you can create pages.
# Create Page
Choose whether or not this Node should create a Page (or just be a menu item).
# Page Template
When you set the Create Page toggle to “Create”, the “Page template” option will appear. Any Templates you have made available to the Tree will be available here.
Note
You must choose a template in order for the page to be created. If you choose to Create a Page with the toggle, but do not choose a template, no page will actually be created.
# Entry Listing Options
Here is where some of Construct’s new tricks come into play. When you select a template that has channels available for listing, the new “Entry Listing Options” section will appear.
# Listing channel(s)
Based on the listing channels you have made available to the template, one or more channels can be chosen here to list entries from.
# Pagination
Once you have chosen one or more channels, you can chose whether or not the listing should be paginated. If you choose to paginate, you can set the amount per page (Construct defaults to 10).
# Listing entry template
If you have made any templates available to list single entries from the chosen listing channel(s), you can choose one of them here to display single entries from your listing channel. When you do so, entries will be available as /path-to-node/entry_url_title and will be displayed using the template you selected.
# Listing category template
If you have made any templates available to list categories from the chosen listing channel(s), you can choose one of them here to display category entries from your listing channel. Category pages will be available as /path-to-node/category/cat_url_title.
# Simple Nodes (menu creation only)
As referenced at the top of this page in the settings segment, using Construct to build menus only is a perfectly viable use of Construct as it is very powerful for doing just that. Construct only shows the user what they need to see whenever possible. So if you have disabled Construct’s routing option in settings. Construct will show a very minimal Node editing screen so as to keep things very user friendly.